
#2 - Initial Setup of FortiAnalyzer in EVE-NG / PNETLab (Management Interface + Internet Access)

Table of Contents (11 sections)
In this guide, we will walk through the initial configuration of a FortiAnalyzer appliance running in a lab environment using EVE-NG or PNETLab. The goal is to establish management access, enable internet connectivity, and prepare the device for FortiGuard services.
Lab Environment
- Platform: EVE-NG / PNETLab
- Image: FortiAnalyzer v7.0.3 (build 0254)
- CPU: 4 vCPU
- RAM: 8192 MB
Step 1 – First CLI Access
Access the FortiAnalyzer via the console using:
- Username:
admin - Password: (leave blank)
On the first login, you will be prompted to set a new password. This is mandatory before proceeding.
Step 2 – Configure the Management Interface
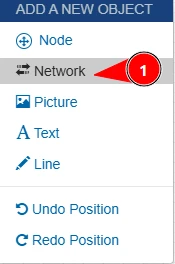
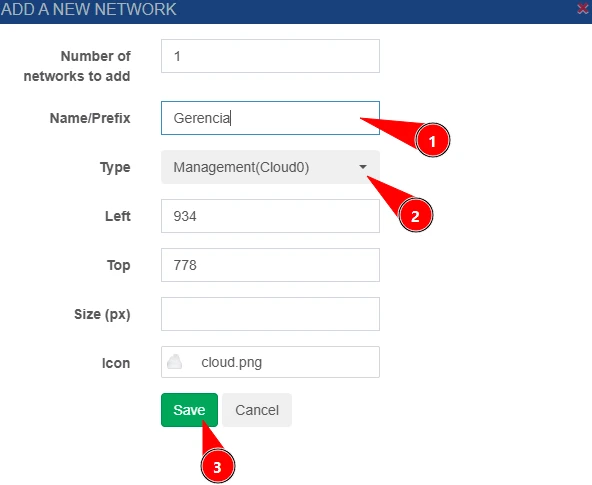
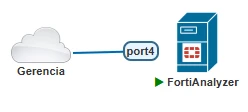
To simplify access to the device, connect one interface (in this example, port4) to a Cloud (bridge) network in EVE-NG/PNETLab. The bridge must terminate on an isolated, trusted management segment that is reachable only from your administration host. Do not attach this interface to a shared LAN, untrusted Wi-Fi network, or any publicly exposed network.
Configuration
Accessing the device’s CLI via terminal:
config system interface
    edit port4
        set ip 192.168.0.X/24
        set allowaccess https ssh ping
        set alias "GERENCIA"
    next
end- Replace
192.168.0.Xwith an available IP in your local network. - The
allowaccessparameter enables encrypted HTTPS and SSH management plus ICMP diagnostics. Cleartext HTTP management remains disabled. - The alias is optional but helps identify the interface.
- Keep this address on the isolated management segment and restrict administrator trusted hosts to the administration workstation or subnet.
Connectivity Test
execute ping 192.168.0.1If configured correctly, the device should be able to reach your local gateway.
Step 3 – Configure Default Gateway
To allow external connectivity (internet access), configure a default route:
config system route
    edit 1
        set gateway 192.168.0.1
        set dst 0.0.0.0/0
        set device "port4"
    next
end
Test External Connectivity
execute ping 8.8.8.8A successful response confirms basic internet connectivity.
Step 4 – Configure DNS
DNS configuration is required for name resolution and proper communication with FortiGuard services.
config system dns
    set primary 1.1.1.1
    set secondary 1.0.0.1
end
Test Name Resolution
execute ping google.comIf this works, DNS is correctly configured.
Step 5 – Access via Web Interface and Licensing
Now you can access the FortiAnalyzer GUI from your browser:
https://192.168.0.XLog in using your FortiCloud account credentials:
Once authenticated, your lab device will automatically receive a trial license, allowing you to explore features for learning and testing purposes.
Final Notes
- Ensure your EVE-NG/PNETLab cloud interface is bridged only to the isolated management segment.
- Avoid IP conflicts with other devices on your LAN.
- If pings fail, verify your bridge configuration and gateway settings.
This setup provides a clean and efficient way to manage your FortiAnalyzer directly from your local machine without additional virtualization overhead.
***GERENCIA = Management
Was this configuration guide helpful?
If you have questions, encountered issues during setup, or want to discuss networking and security, connect or reach out on LinkedIn.
Connect on LinkedIn